Saturday, March 22, 2014

Beef & veggie tagine

Beef & veggie tagine

Ever since my trip to Marrakech I've been wanting to share this recipe with you. It's really easy (just how I like it) and very tasty. Each time I make it it takes me back to those lovely days with my girls having fun in the sun.

You can use all kinds of veggies: peas, chickpeas, broad beans, carrots, eggplant, courgette, potatoes, paprika etc. But my tagine always includes carrots cause I love the sweetness it adds to the dish.
The original recipe used a fairly large amount of oil (a full cup) but I've cut this back to half a cup to make it a bit leaner.

Don't worry if you don't actually own a tagine, I don't either. All you need is a lidded pot, preferably with a thick bottom.

Ingredients:
  • 1 medium onion
  • 1 large tomato 
  • 300 g cubed beef or lamb
  • 600 g veggies 
  • 1/2 tbsp cumin powder
  • 1/2 tbsp paprika powder
  • 1 tsp turmeric powder
  • 1/2 tbsp powdered coriander seed
  • 1/2 tbsp powdered ginger 
  • 1/2 tbsp tomato purée 
  • Pinch of black pepper
  • Salt
  • Olive oil (or another vegetable oil)
  • Cup of water

Directions:
  1. Wash veggies and cut lengthwise  in like sized pieces so it will cook evenly. 
  2. Chop up onion and sauté in olive oil on medium heat. Add meat, cumin, ginger, paprika, turmeric, coriander powder & black peper and sear on all sides. 
  3. Beef and spices Seared beef Piled veggies
  4. Add the tomato and tomato purée and let it caramelize a bit while occasionally stirring. 
  5. Pour in the water so the meat is neatly submerged. Put the lid on and cook on high heat for 15 minutes. Then reduce heat to a simmer and continue to cook for 45-60 minutes. Stir occasionally and if necessary add some water to keep it from scorching. 
  6. Next add salt to taste and quite literally pile the veggies on top. Start with the firmer veggies like carrots and potatoes then the others like courgette and paprika. You're basically building a little pyramid to steam cook the veggies. 
  7. Add some water so the meat is sort of half submerged. Bring to a boil then reduce heat to a simmer and allow to cook for about 20 minutes. You want to end with cooked veggies that still have a bite to them floating in a nice and thick sauce.

    I served it with a fresh tomato salad, harissa yoghurt, fluffy couscous and some thick bread for dipping up that lovely sauce. Yum yum!
  8. Tomato salad Harissa yoghurt Couscous

Saturday, March 8, 2014

Roasted pepper & tomato soup

Roasted pepper & tomato soup

My mom makes an awesome roasted tomato & pepper soup but I did it the other way around. Why? Because my grocer had an awesome deal on those tiny snack peppers and I didn't know what to do with them anymore. So this was an easy way make something tasty and get rid of them at the same time ;)

I used yellow snack peppers, but basically you can use any sweet pepper except for the green one. They aren't as sweet and make for a icky colored soup. 

My mom uses fresh ones but I went for the easy way and used canned tomatoes. If you do decide to use fresh tomatoes just cut them up and roast them together with the peppers. 

I like adding some macaroni pasta to make it a bit more filling. A sprinkle of fresh basil leaves can be very yummie too. But even without add-ons it's a lovely light soup. 

Ingredients:
  • 1 medium onion
  • 3 cloves of garlic
  • 500 g sweet peppers
  • 300 g canned tomatoes 
  • 600 ml stock
  • Freshly ground pepper
  • Salt
  • Sugar

Directions:
  1. Preheat oven at 200 C.
  2. Deseed the peppers and cut in half.
    Roughly cut the onion and crush the garlic with the skin.
    Arrange veggies on a baking tray and sprinkle with olive oil. Season with freshly ground pepper and salt.
  3. Place tray in oven and roast for about 15 minutes. Flip and stir veggies and roast for another 15 minutes.
  4. Remove the skin from the garlic and place in a pot together with the tomatoes and stock.
    Bring to a boil and continue cooking at medium heat for about 30 minutes. 
  5. Cut peppers Grilled peppers Add stock to veggies
  6. Now turn of heat and purée soup with a stick blender. 
  7. Next press trough a sieve getting rid of all the leftover chunky or stringy bits. 
  8. Soup purée Press trough sieve Smooth soup
  9. Season to taste with the salt and sugar and serve with a spoon of yoghurt or cream.

Friday, January 24, 2014

Rainbow in the clouds scarf

Ain't this the sweetest thing you've ever seen!  Clearly I didn't make it for the teddy, but my mini wasn't feeling up to modeling so I went with plan B.

The scarf itself is really simple, just 16 rows of front loop single crochets. Front loop only because I like that ridged look it creates. I made it long enough to be wrapped twice around the neck, but I didn't count how many stitches it was. Sorry...

The cloud part was a bit more challenging. I just couldn't find an easy pattern that was properly shaped. In the end It took me about two days of trying before I came to this pattern. It's not perfect but it gets the job done. 
I made a prototype cloud in "normal" yarn but switched to fluffy yarn for the scarf. Fortunately fluffy yarn tends to cover up some of the mistakes you make. Unfortunately the texture of fluffy yarn makes it a lot more likely that you'll be making mistakes.

To make life easier on myself I crocheted the clouds with a 8 mm hook. This and the fluffy texture did resolve in the clouds being slightly bigger in fluffy yarn than the prototype.
I know working with fluffy yarn can be very daunting. The best tip I can give you is to just trust your muscle memory and to "feel" your way trough. Your fingers will be a better tool in determining where your next loop is than your eyes. 

I wanted to have a "cloudy" look on both sides but I didn't want to make it to heavy. So I sewed on one cloud then outlined a cloud on the back with slip stitches and filled it in with a combo of slip stitches and single crochets. I know that's not very technical at best it's very pragmatic ;)

Necessities: 
  • 4 colors of yarn (I used acrylic yarn)
  • White fluffy yarn
  • 7 mm hook
  • 8 mm hook
  • Needle

Stitches used:
Sc = single crochet
Sl = slip stitch 
Sk = skip 
St = stitch
Dc = double crochet
Hdc = half double crochet
Front loop = the loop facing you/closest to you

Directions scarf:
With your 7 mm hook make a chain in your desired length.
Round 1: ch1, sc trough front loop of second chain from hook, repeat till end of chain. Turn. 
Round 2: ch1, sc trough front loop of second chain from hook, repeat till end of row. Turn. 
Round 3: ch1, sc trough front loop of second chain from hook, repeat till end of row. In the last stitch we will be changing color. 
To change color, you insert your hook and pull up one loop (two loops on hook). Instead of pulling trough a loop of your original color you pull trough a loop of your new color. Make sure you keep hold of the tails of both colors of yarn to get proper yarn tension. Turn. 
Round 4: ch1, turn your tails around so they are lying on top of your last row. Now simply continue crocheting single crochets trough front loop till end of row. This will literally secure and incorporate the tails into your scarf. Turn. 
Round 5-15: repeat this process for all your colors, then finish off and weave tails in. 

Directions clouds (make 2):
Chain 4, join with sl. 
Round 1: 4sc in ring = 4st 
Round 2: 2sc in each sc = 8st
Round 3: 2sc in each sc = 16st
Round 4: 2sc in each sc, join with sl= 32st (I know technically we did 33 but your circle hasn't gotten any bigger, so it still counts as 32)
Round 5: sk2, 8dc in third stitch from hook, sk2, sl in next 9st, sk2, 8dc in third stitch from hook, sk2, sl, 2hdc in next 2 stitches, 2dc in next 3 stitches, 2hdc in next 2 stitches, sl = 41st
You should have ended up at the base of your star (aka the little semi-circle that we've added), if this is not the case add slip stitches until you do.
Round 6: 2hdc in next 8 stitches, sl in next 9 stitches, 2hdc in next 8 stitches,sl and finish off. Leave a very long tail to sew. 
Rainbow scarf Cloud prototype Cloud prototype on fluffy cloud

Assemble: 
Place cloud on scarf and use needle and tail to sew to scarf. Next use the same tail to crochet an outline on the backside of your scarf with slip stitches. How you say? You don't have a loop! Yes, you do. Simply insert your hook in one your existing stitches and pull up a loop. Crochet away. Use a combo of sl and sc to fill in the outline by crocheting in the gaps.
Sew cloud to scarf Outline cloud with slip stitches Filled in cloud

Surprise your favorite mini with this cute & warm scarf!

Thursday, January 16, 2014

DIY new old boots

DIY new old boots
Now this is a project that was born out of curiosity and frugalness. I was looking for a pair of simple black leather boots that wouldn't brake the bank. As it is sale everywhere I thought it wouldn't be too difficult to find one. I was wrong.
I either didn't like the style or they didn't have my size. 

What I did have was this old pair in a taupe liver like color that were a lovely fit but an awful shade. Why did I buy them again? I was planning to throw them out before my next trip and out of nowhere I started  wondering if I couldn't paint them black. I researched it online and it seemed very doable. 

So off I went to the shoe repair shop to buy me some leather paint. The one I purchased, Gala shoe black, comes with a little brush to apply the paint with. It does require you to seal the paint with shoe cream but I had plenty of that at home so I didn't buy the recommended Gala shoe cream. 

All it took were a few coats of paint and some patience and I just LOVE how the boots turned out! The paint gave it a nice deep black shade and even before I polished it it had a nice sheen to it. And oh yeah, it only cost me €5,85!
Of course they're not as good as new ones but that's because... they're not new ;)

Necessities:
  • A pair of old boots
  • Acetone 
  • Cotton buds
  • Black leather paint (Gala shoe black)
  • Black shoe polish
  • Shoe brush
  • Old newspapers 

Instructions:
  1. Brush old dirt of the boots. 
  2. Clean the boots with cotton buds dipped in acetone. This will remove the top layer of the paint so the black paint can seep in and give you a nice deep shade. Leave to dry for at least an hour. 
  3. Place boots on old newspapers. 
  4. Shake the bottle of paint (doesn't actually state that anywhere but it makes sense to do it) and start painting. Leave to dry for 1-2 hours.
  5. boots after acetone paint away first coat
  6. Repeat painting process until you're happy with the result. It took me about three coats before I was satisfied. I also made sure to apply each coat in a different direction so I wouldn't end up with noticeable stripes or patterns. I also painted the heel and the sides of the sole.
  7. After the last coat I left the boots to dry overnight. Then I applied the shoe cream and polished it to a nice sheen.
    Tadaaaa new old shoes!

Monday, January 6, 2014

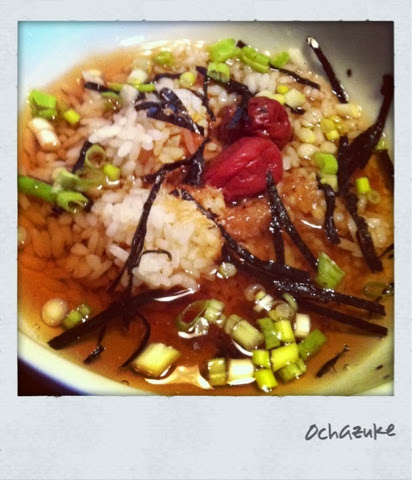
Ochazuke

Ochazuke
As I find myself sick in bed with a cold I've been enjoying some of this yummie ochazuke. This is truly comfort food.
Is it tea or soup, or both? Who cares it's delicious!

This is one of those dishes that hardly can be considered to have a recipe. All you do is stack a few ingredients in a bowl and dig in. Personally I really like this umeboshi version cause its really lean and plain. Most people would probably add some salted salmon bits, but each to their own. 

Funny fact: It is said that ochazuke is offered to people who have overstayed their welcome. So if you are visiting friends and are offered ochazuke, that should be your clue to leave ;)

Ingredients (single serving):
  • 1/2 cup cooked whole grain rice 
  • 1 tsp bonito flakes
  • 1 tsp soy sauce
  • 2 umeboshi plums 
  • A handful of chopped spring onions
  • Dried roasted seaweed, cut in tin strips 
  • Steaming hot cup of strong hojicha tea

Directions:
  1. Place rice in a bowl (reheat if its cold). 
  2. Pour in soy sauce and place bonito flakes and umeboshi on top. Sprinkle with spring onions and roasted seaweed. 
  3. Lastly add the hot hojicha tea and dig in. 

*For more tips & variations on ochazuke check out this site.

Friday, December 20, 2013

Christmas tree meringues

Christmas tree meringues
These cute meringues are a yummie bite and they make for cute decoration. Who can ask for any more than that ;)

Ingredients:
  • 3 egg whites
  • 1/4 tsp cream of tartar
  • 150 g super fine caster sugar
  • 1/2-1 tsp lemon flavoring (or whatever you like)
  • Green icing color (I used Wilton's leaf green)
  • Yellow icing color (I used Wilton's Holden yellow)
  • Small star tip (I used Wilton's star tip 21)
  • Large star tip (I used Wilton's 1M)
  • Piping bags
  • Parchment paper 
  • sprinkles

Directions:
  1. Preheat oven to 125 C. 
  2. Place the egg whites in mixing bowl with cream of tartar and mix on medium speed until nice and fluffy. Add flavoring and slowly spoon in the sugar while mixing at high speed. You'll know when it's done when the sugar is dissolved and you get nice stiff peaks.
  3. So because we're making the yellow tips first. We remove about 3-5 tablespoons of batter and gently mix in the yellow food coloring. Then place in piping bag and pipe small stars on parchment paper. Just gently squeeze and pull up to get them a bit elongated.
  4. Bake in oven for about 5-10 minutes. The tips are very small and light in color so you really don't want them to burn. The objective is for them to be firm to the touch so you can pick them up and manhandle them later. 
  5. Mix green coloring into the rest of the batter. Fill piping bag and pipe trees on parchment paper. Basically you're piping three kisses on top of each other. Hold piping bag straight with the tip just slightly above the parchment paper. Squeeze untill the kiss is youre desired size and gently pull up. Don't remove tip just hold still and repeat by piping a smaller kiss on top. Repeat again for the third and last kiss. If you like you can make the top kiss nice and peaky by pulling up while still very very gently squeezing your piping bag. But we're gonna at the yellow tips so not really necessary. Piped christmas tree meringues
  6. Place the baked yellow tips on top and sprinkle your trees with colored sprinkles. Tadaaaaa. Just pop them in the oven and bake for 40-60 min, depending on how chewy you like them. 
*Once properly cooled make sure you store them in an airtight container otherwise they'll just go soft. 

Thursday, December 12, 2013

I'm back!

So good to be back again!

My trip was lovely and anyone interested can read about it HERE.

I'm looking forward to spend the holidays with my family and friends and have already been thinking what kind of yummie and crea bea stuff I'd like to get my hands on. You see I've kind of missed cooking, baking and getting down and dirty. And as it happens I'll be having lots of time on my hands since I don't have any work. Bad news for my wallet but good news for the blog.
So stay tuned for some good December fun!

P.S. I have a great new blog for you to check out by my very own sis: CULINESSA!

Thursday, October 3, 2013

Boulanger, Surinamese style

Who would've thought I'd be cooking out here in the Philippines. But that's exactly what I'm doing. Turns out, I'm not crazy about the food here. And it's either spending way to much for an ok diner or cooking myself. So today I'm making boulanger, Surinamese style. Boulanger, or eggplant, is easy made. Which is great cause I don't want to buy a lot of stuff I won't be using afterwards. Only thing to keep in mind is that I'm not using the European type of eggplant but more like the Indian ones.

5-6 small eggplants (2-3 medium ones)
1 medium onion
1 small tomato
1 tbsp dried shrimp*
1-2 cubes maggi
Salt and pepper to taste
1 Madame Jeanette pepper (optional)

Ok so place your shrimps in a bit of hot water and leave to soak for a minute or two. Drain and set aside.
Next peel your eggplants and chop them up in small cubes.
Chop up you tomato and set aside.
Chop up your onion and place in pan with a bit of oil. Make sure your pan has a lid as you'll be leaving the eggplant to simmer. I actually had to switch pans here cause the first one didn't come with a lid...

Sauté onions on medium to low heat. Add the eggplant and mix with onions. Place lid on top and leave to simmer on low heat. 


When the eggplant starts to welt add the tomato, shrimps and maggi. Stir and leave to simmer again. If you're using madame Jeanette pepper, this would be the time to add it. 
Add more maggi, salt and pepper to taste. You're dish is done when the eggplant is almost smooth. It should still be a bit lumpy but cooked through completely.
Enjoy!

* I actually didn't have any dried shrimps, so I used dried squid instead. Clearly this has a much stronger flavor so I just used half of a small squidie bit.

Tuesday, October 1, 2013

I've sneaked off

Ok I'm sorry, but I'm really not. It's been quiet here for a while now and that has its reasons. Truth is I've been preparing my escape into Asia. I told you guys before that I was hoping to find employment there but I'm tired of waiting. So I've just head off into the unknown. There are a few options I'm still waiting to hear on and I'm really hoping it will work out cause that would allow me some carefree  traveling for a few months. In the meantime I've sneaked off to the Philippines for some well needed r&r.

Ttyl ;) 

Monday, September 23, 2013

Cake-saster

Yesterday was my baby's birthday and I was in charge of the cake. I was supposed to make grass cupcakes, a mini vegan cake for the birthday girl and a regular cake for the rest of the party. I choose to make the cuppies vegan as well 'cause I didn't want her to miss out on that. And I was using this great recipe by Vegan cupcakes take over the world so I'm pretty sure no one even noticed they were vegan. Cuppies, check. Mini cake, check. Regular cake, disaster. I really don't know what went wrong but I tried four different recipes and they all failed miserably. Straight to the bin they went.
By the time the last failure was determined it was too late to solve the problem in any other way than to just buy a cake. So that's what we did. 
In the end it all worked out (sort of) and we had a great party. The bday girl made us sing happy birthday a zillion times and giggled the day away. 

Wednesday, August 14, 2013

Korean Garden

So my friend Pascal and I got together to try Korean Garden. Actually I wanted to go to Yokiyo but apparently they don't take reservations for the DIY bbq if you're just a party of two :(

At Korean Garden they serve a very acceptably priced mix and match set meal for either €22,50 (set A) or  €25,50 (set B). So we gave it a go and ordered the B set. That got us a salad with fried chicken and fried salmon, surimi crabcakes, tempura vegetables and beef bulgogi. The food was ok, but was missing the strong spicy flavors that typify Korean cuisine. Staff was attentive but as the place wasn't very busy they seemed to not really know what to do with themselves. Overall we had an ok diner but this was a typical one-time-is-enough-visit.
salad salad Surimi crabcakes
Tempura Ice cold beer Beef bulgogi
* As it took me quite some time to actually write about this diner, Korean Garden now has a shared dining concept for €20 p/p. I thought I'd mention that for those of you that would like to check them out.

Monday, August 12, 2013

Absent but presently active!

I'm so sorry I haven't written anything in over a month! It's actually really stupid cause I had all kinds of stuff I wanted to share with you. But basically things have been... turbulent. Mostly to do with my inner restlessness. As it stands I'm booked to leave on THE-big-leap-of-faith-trip-into-China-or-wherever-faith-will-carry-me end of September. Really really BIG! So needless to say there are a lot of decisions to be made. I find most of them to be incredibly daunting and hard! You see, I don't want to limit myself but realistically I need to cut things to improve my chances of actually succeeding. SO HARD!

Ok, so in the past few months I've been trying very hard to land a job on my own. This has lead to countless of disappointing and frustrating moments. There are many agencies and people out there trying to make a buck of people like me. Personally I find that if it sounds to good to be true, it probably is. Niws, right now I'm still in the running for a few positions but in all honesty I'm more hopeful than optimistic.

So that being said I will try to post as much of my culinary adventures before I leave. After that who knows when I'll be able and willing to actually cook/bake for myself again...


Friday, July 5, 2013

Courgette Quiche

Courgette Quiche
Another lovely quiche recipe that's easy and delicious. Perfect for a summer-ish meal and keeps great in the fridge! I used the same crust recipe as for my Spinach Quiche, but without the cheese.
I once made this as a kosher version by making the crust out of pulverized matzes and using potato flour instead of regular flour. I didn't try the kosher version myself, but my cousin (for whom it was intended) told me I would be in charge of kosher quiche till the end of time. I guess he must have liked it ;)

Ingredients crust:
  • 125 gr unsalted butter
  • 250 gr flour
  • 1 tsp salt
  • 2 egg yolks (medium eggs)
  • 2-3 tbsp ice water

Ingredients filling:
  • olive oil
  • 1 medium onion, chopped finely
  • 3 garlic cloves, chopped finely
  • 2 courgettes, grated
  • dried Italian herbs (think thyme, oregano, basil etc.)
  • nutmeg, salt and pepper for seasoning
  • 100 gr cream cheese
  • 4 eggs
  • 100 gr matured cheese, grated
  • 3 tbsp flour

Directions crust:
  1. Sieve flour, butter and salt in a mixing bowl. Crumble the butter with your hands or a fork.
  2. Now add the ice water to the egg yolks and whisk together. Add to your flour mixture. 
  3. Mix in the egg with a fork then continue kneading it into a dough with your hands. Once you have a well blended dough, wrap it up in plastic foil and place in the refrigerator for at least 30 min.
  4. Flour, salt and butter mix Crumbled butter  Flour mix + egg Finished dough
  5. Roll out the dough so it's approximately 0,5 cm thick.  Place in your quiche pan and trim of any excesses. With a fork prick holes over the bottom. 
  6. Place some wax paper on top and pour in some dried beans*. Bake blind in oven for 10-15 min. Then brush with some egg wash and bake again for another 5-10 minutes.
  7. Rolled out & pricked dough Bake blind Brushed with eggwash Finished

Directions filling
  1. Sprinkle some salt over the grated courgette and place in a clean dry kitchen towel. Leave to stand for a few minutes and then squeeze out the excess juices. 
  2. Sauté onion and garlic in some olive oil until cooked. Add in the courgette and season with Italian herbs, freshly ground pepper and salt.
  3. Sauté onion Add courgette Cooked courgette
  4. In a large mixing bowl place cream cheese, grated cheese and eggs and mix together with a fork.
  5. Add cooked courgette and mix through. Next add the flour and mix together.
  6. Pour the courgette cheese mixture in your baked crust.
  7. Place quiche in oven and bake in 30-45 minutes.
  8. Cheese & eggs Add courgette Pour in baked crust Baked courgette quiche