Thursday, January 16, 2014

DIY new old boots

DIY new old boots
Now this is a project that was born out of curiosity and frugalness. I was looking for a pair of simple black leather boots that wouldn't brake the bank. As it is sale everywhere I thought it wouldn't be too difficult to find one. I was wrong.
I either didn't like the style or they didn't have my size. 

What I did have was this old pair in a taupe liver like color that were a lovely fit but an awful shade. Why did I buy them again? I was planning to throw them out before my next trip and out of nowhere I started  wondering if I couldn't paint them black. I researched it online and it seemed very doable. 

So off I went to the shoe repair shop to buy me some leather paint. The one I purchased, Gala shoe black, comes with a little brush to apply the paint with. It does require you to seal the paint with shoe cream but I had plenty of that at home so I didn't buy the recommended Gala shoe cream. 

All it took were a few coats of paint and some patience and I just LOVE how the boots turned out! The paint gave it a nice deep black shade and even before I polished it it had a nice sheen to it. And oh yeah, it only cost me €5,85!
Of course they're not as good as new ones but that's because... they're not new ;)

Necessities:
  • A pair of old boots
  • Acetone 
  • Cotton buds
  • Black leather paint (Gala shoe black)
  • Black shoe polish
  • Shoe brush
  • Old newspapers 

Instructions:
  1. Brush old dirt of the boots. 
  2. Clean the boots with cotton buds dipped in acetone. This will remove the top layer of the paint so the black paint can seep in and give you a nice deep shade. Leave to dry for at least an hour. 
  3. Place boots on old newspapers. 
  4. Shake the bottle of paint (doesn't actually state that anywhere but it makes sense to do it) and start painting. Leave to dry for 1-2 hours.
  5. boots after acetone paint away first coat
  6. Repeat painting process until you're happy with the result. It took me about three coats before I was satisfied. I also made sure to apply each coat in a different direction so I wouldn't end up with noticeable stripes or patterns. I also painted the heel and the sides of the sole.
  7. After the last coat I left the boots to dry overnight. Then I applied the shoe cream and polished it to a nice sheen.
    Tadaaaa new old shoes!

Monday, January 6, 2014

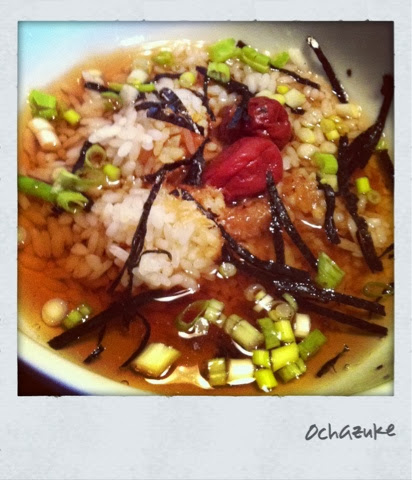
Ochazuke

Ochazuke
As I find myself sick in bed with a cold I've been enjoying some of this yummie ochazuke. This is truly comfort food.
Is it tea or soup, or both? Who cares it's delicious!

This is one of those dishes that hardly can be considered to have a recipe. All you do is stack a few ingredients in a bowl and dig in. Personally I really like this umeboshi version cause its really lean and plain. Most people would probably add some salted salmon bits, but each to their own. 

Funny fact: It is said that ochazuke is offered to people who have overstayed their welcome. So if you are visiting friends and are offered ochazuke, that should be your clue to leave ;)

Ingredients (single serving):
  • 1/2 cup cooked whole grain rice 
  • 1 tsp bonito flakes
  • 1 tsp soy sauce
  • 2 umeboshi plums 
  • A handful of chopped spring onions
  • Dried roasted seaweed, cut in tin strips 
  • Steaming hot cup of strong hojicha tea

Directions:
  1. Place rice in a bowl (reheat if its cold). 
  2. Pour in soy sauce and place bonito flakes and umeboshi on top. Sprinkle with spring onions and roasted seaweed. 
  3. Lastly add the hot hojicha tea and dig in. 

*For more tips & variations on ochazuke check out this site.

Friday, December 20, 2013

Christmas tree meringues

Christmas tree meringues
These cute meringues are a yummie bite and they make for cute decoration. Who can ask for any more than that ;)

Ingredients:
  • 3 egg whites
  • 1/4 tsp cream of tartar
  • 150 g super fine caster sugar
  • 1/2-1 tsp lemon flavoring (or whatever you like)
  • Green icing color (I used Wilton's leaf green)
  • Yellow icing color (I used Wilton's Holden yellow)
  • Small star tip (I used Wilton's star tip 21)
  • Large star tip (I used Wilton's 1M)
  • Piping bags
  • Parchment paper 
  • sprinkles

Directions:
  1. Preheat oven to 125 C. 
  2. Place the egg whites in mixing bowl with cream of tartar and mix on medium speed until nice and fluffy. Add flavoring and slowly spoon in the sugar while mixing at high speed. You'll know when it's done when the sugar is dissolved and you get nice stiff peaks.
  3. So because we're making the yellow tips first. We remove about 3-5 tablespoons of batter and gently mix in the yellow food coloring. Then place in piping bag and pipe small stars on parchment paper. Just gently squeeze and pull up to get them a bit elongated.
  4. Bake in oven for about 5-10 minutes. The tips are very small and light in color so you really don't want them to burn. The objective is for them to be firm to the touch so you can pick them up and manhandle them later. 
  5. Mix green coloring into the rest of the batter. Fill piping bag and pipe trees on parchment paper. Basically you're piping three kisses on top of each other. Hold piping bag straight with the tip just slightly above the parchment paper. Squeeze untill the kiss is youre desired size and gently pull up. Don't remove tip just hold still and repeat by piping a smaller kiss on top. Repeat again for the third and last kiss. If you like you can make the top kiss nice and peaky by pulling up while still very very gently squeezing your piping bag. But we're gonna at the yellow tips so not really necessary. Piped christmas tree meringues
  6. Place the baked yellow tips on top and sprinkle your trees with colored sprinkles. Tadaaaaa. Just pop them in the oven and bake for 40-60 min, depending on how chewy you like them. 
*Once properly cooled make sure you store them in an airtight container otherwise they'll just go soft.